
Arduino: LEDs ελέγχου - πώς λειτουργεί
Οι μικροελεγκτές Arduino διευκολύνουν τον έλεγχο των ηλεκτρονικών εξαρτημάτων. Αυτή η πρακτική συμβουλή σας δείχνει τον τρόπο ελέγχου ενός LED με το Arduino σας.
LED ελέγχου μέσω του Arduino: Τα απαιτούμενα εξαρτήματα
Προτού μπορέσετε να ελέγξετε τις λυχνίες LED με το Arduino σας, πρέπει να βεβαιωθείτε ότι έχετε όλα τα απαραίτητα εξαρτήματα.
- Πρώτα απ 'όλα, φυσικά χρειάζεστε ένα Arduino. Για τους αρχάριους, συνιστάται το Arduino Uno ή το Arduino Mega 2560. Επειδή τόσο το λογισμικό Arduino όσο και το υλικό Arduino είναι ανοιχτού κώδικα υπό την έννοια της ανοιχτής πηγής, υπάρχουν και φθηνότερες πλακέτες Arduino που δεν κατασκευάζονται από τον ίδιο τον Arduino, αλλά από άλλη εταιρεία.
- Εκτός από ένα Arduino, χρειάζεστε επίσης LED. Μπορείτε να διαφοροποιήσετε μεταξύ LED μονοστοιχείων και LED RGB.
- Θα πρέπει επίσης να πάρετε μερικούς αντιστάτες καθώς η τάση μιας κανονικής καρφίτσας Arduino (U = 3.3 V) είναι λίγο υπερβολικά υψηλή για τα LED.
- Για να μπορείτε να μεταφέρετε ευκολότερα τα εξαρτήματα, μπορείτε να χρησιμοποιήσετε ένα breadboard έτσι ώστε να μην χρειάζεται να κολλήσετε τα εξαρτήματά σας.
- Επίσης, μην ξεχάσετε να αγοράσετε καλώδια jumper έτσι ώστε να μπορείτε επίσης να συνδέσετε τα εξαρτήματα.
- Με την ευκαιρία, μπορείτε να βρείτε πολλά πρακτικά σετ αρχάριων Arduino στο Διαδίκτυο που μπορούν να εξοικονομήσουν πολλά χρήματα, αφού όλα τα εξαρτήματα περιλαμβάνονται ήδη.
Έλεγχος των LED μέσω του Arduino: παρασκευάσματα
Αφού έχετε πάρει όλα τα σημαντικά συστατικά, πρέπει τώρα να κάνετε μερικές τελικές προετοιμασίες.
- Το πρώτο πράγμα που πρέπει να κάνετε είναι να εγκαταστήσετε το IDE του Arduino στον υπολογιστή σας. Κατά τη διάρκεια της εγκατάστασης, μπορεί να σας ζητηθεί να εγκαταστήσετε διαφορετικούς οδηγούς Arduino. Θα πρέπει σίγουρα να το κάνετε αυτό, διαφορετικά ο υπολογιστής σας δεν θα αναγνωρίσει το Arduino σας.
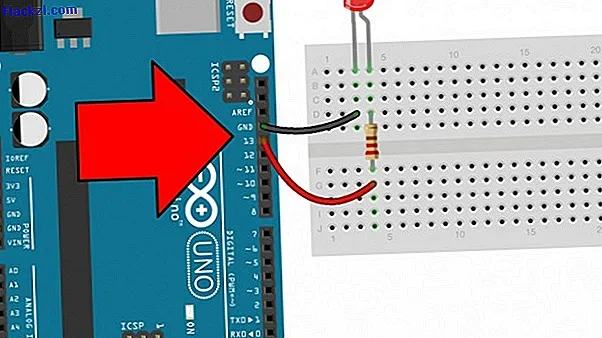
- Στη συνέχεια συνδέστε μια λυχνία LED στο Arduino σας όπως φαίνεται στην εικόνα.
- Στη συνέχεια, ξεκινήστε το IDE του Arduino. Στο "void setup ()" πρέπει πρώτα να ορίσετε την ακίδα στην οποία είναι συνδεδεμένη η LED ως έξοδος. Αυτό γίνεται εύκολα με την εντολή "pinMode (13, OUTPUT)"; (χωρίς εισαγωγικά). Στην περίπτωσή μας, η λυχνία LED είναι συνδεδεμένη στον ακροδέκτη 13.
- Στο "κενό βρόχο ()" μπορείτε να ορίσετε ποιες εντολές πρέπει πάντα να εκτελούνται το ένα μετά το άλλο. Πρώτα μπορείτε να καρφιτσώσετε 13 με την εντολή "digitalWrite (13, HIGH);" ρυθμίστε σε "ΥΨΗΛΟ". Αυτό σημαίνει ότι εφαρμόζεται η πλήρης τάση (3.3 V).
- Στη συνέχεια, μπορείτε να χρησιμοποιήσετε μια εντολή καθυστέρησης για να περιμένετε το πρόγραμμα 1000 χιλιοστά του δευτερολέπτου: "καθυστέρηση (1000);"
- Στη συνέχεια, πρέπει να ρυθμίσετε τον ακροδέκτη 13 πίσω στο "LOW": "digitalWrite (13, LOW)"
- Τέλος, προσθέστε μια εντολή καθυστέρησης.
Arduino: Αφήστε το LED να αναβοσβήνει
Αφού ολοκληρώσετε το πρόγραμμα και συνδέσετε σωστά όλα τα εξαρτήματα, μπορείτε να φορτώσετε το πρόγραμμα στο Arduino σας.
- Αν όλα λειτουργούσαν σωστά, το LED θα έπρεπε τώρα να αναβοσβήνει.
Arduino: ελέγξτε την ενσωματωμένη λυχνία LED
Εάν διαθέτετε ένα Arduino αλλά δεν υπάρχει LED, μπορείτε επίσης να ελέγξετε την ενσωματωμένη λυχνία Arduino.
- Αντί για τον αριθμό μιας καρφίτσας, απλά πρέπει να χρησιμοποιήσετε "LED_BUILTIN" στις εντολές.

Στην επόμενη πρακτική συμβουλή, θα μάθετε πώς μπορείτε να χρησιμοποιήσετε το Raspberry Pi ως αναμεταδότη WiFi. Μπορείτε επίσης να προμηθευτείτε ηλεκτρονικά εξαρτήματα σε χαμηλές τιμές από τη Conrad χρησιμοποιώντας τις εκπτώσεις μας.