
Αλλάξτε τον δείκτη του ποντικιού στα Windows 7 - Δείτε πώς
Διαβάστε αυτήν την πρακτική συμβουλή σχετικά με τον τρόπο αλλαγής του δείκτη του ποντικιού στα Windows 7.
Αλλάξτε οπτικά το δείκτη του ποντικιού στα Windows 7
- Κάντε κλικ στο εικονίδιο "Έναρξη" ή "Windows" και έπειτα στο "Πίνακας Ελέγχου".
- Τώρα επιλέξτε την κατηγορία "Υλικό και ήχοι".
- Στην ενότητα "Συσκευές και εκτυπωτές" κάντε κλικ στο "Ποντίκι" για να ανοίξετε τις ρυθμίσεις του ποντικιού.
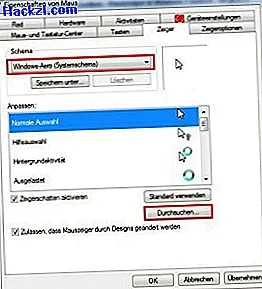
- Ανοίγει ένα παράθυρο που ονομάζεται "Ιδιότητες του ποντικιού". Μεταβείτε στην καρτέλα "δείκτες" παραπάνω.
- Κάτω από το "Σχέδιο" μπορείτε βασικά να αλλάξετε την εμφάνιση του δείκτη του ποντικιού. Για παράδειγμα, ο δείκτης του ποντικιού μπορεί να διευρυνθεί, για παράδειγμα, επιλέγοντας το διάγραμμα "Windows Aero (μεγάλο) (διάγραμμα συστήματος)".
- Στο μενού κύλισης του "Προσαρμογή:" μπορείτε να αλλάξετε το δείκτη του ποντικιού για κάθε εντολή. Για να το κάνετε αυτό, κάντε πρώτα κλικ στην εντολή και, στη συνέχεια, στο "Αναζήτηση ..." και επιλέξτε τον επιθυμητό δείκτη κάνοντας κλικ στο "OK".
- Αποθηκεύστε τις αλλαγές κάνοντας κλικ στο "Εφαρμογή".
- Κάντε κλικ στην επιλογή "Χρήση προεπιλογής", επαναφέρετε όλες τις αλλαγές στις αρχικές ρυθμίσεις.
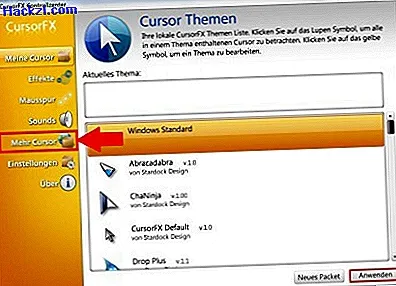
Το "CursorFX" δίδει στον δείκτη του ποντικιού σας ακόμα περισσότερη πινελιά
Με το δωρεάν εργαλείο "CursorFX" μπορείτε εύκολα να κατεβάσετε νέους δείκτες του ποντικιού και να τους ενεργοποιήσετε απευθείας στο πρόγραμμα.
- Εγκαταστήστε το πρόγραμμα "CursorFX" και ξεκινήστε το μετά την εγκατάσταση.
- Οι δείκτες του ποντικιού που έχουν ήδη εγκατασταθεί εμφανίζονται στους "Οι δρομείς μου". Κάνοντας κλικ στο "More Cursors" μπορείτε να κατεβάσετε πιο ενδιαφέροντα δείκτες του ποντικιού από τη σελίδα του προγραμματιστή.
- Με ένα κλικ στο "Εφαρμογή" αλλάζετε το δείκτη του ποντικιού.
Διαβάστε εδώ πώς να αλλάξετε το φόντο της επιφάνειας εργασίας σας.